
Order Matters: The Landscaping Sequence That Saves Braeswood, TX Homeowners From Doing It Twice | Heroes Lawn Care of Bellaire
It is a story heard on more than one street near Brays Bayou. A homeowner finally invests in the yard: fresh sod, new flower beds, a neat border along the walkway. Within a few months a drainage problem appears in the back corner, and the fix requires trenching straight through the brand-new lawn. Or a tree needs work, and the crew has to drag equipment and branches across the freshly planted beds. Sometimes the new sod simply sits in a low spot that floods after every storm, because nobody corrected the grade underneath it.
None of these problems comes from bad materials or careless planting. They come from doing the right work in the wrong order. Successful landscaping in Braeswood, TX depends as much on sequence as on design. Every step either protects the one that follows or puts it at risk. Grade has to be set before drainage is built. Drainage has to be built before soil is prepared. Soil has to be ready before anything living goes into the ground. When the order is right, each layer supports the next. When it is wrong, the yard ends up being torn apart and installed a second time.
This guide lays out that sequence step by step, explaining what happens at each stage and why it has to come before the next. It is the same order professional crews follow on heavy Houston clay when the goal is to do the job once and do it right.
What Goes Wrong When Steps Are Skipped or Swapped
Black gumbo clay makes the consequences of poor sequencing especially harsh. The soil swells when wet and shrinks when dry, drains slowly, and holds water against anything placed on it. Combine that with the heavy rains common near the bayou, and every shortcut shows up quickly.
Sod laid before grading is corrected will settle into the same low spots that held water before. Beds planted before drainage is installed may need to be dug up when the trench goes in. Plants set into unprepared clay often stall or develop root rot within a season. Borders built after the lawn is installed can leave torn edges and uneven transitions. Each mistake on its own seems small, but together they explain why so many yards look worse in their second year than they did on installation day.
Step One: Read the Site Before Touching It
Every well-sequenced project starts with observation rather than excavation. Before any soil moves, the property needs to be understood as a whole: how water travels across it, where sun and shade fall during the day, what lies buried beneath the surface, and how the household plans to use the space.
Mapping Water, Shade, and Buried Lines
A professional site evaluation looks at the existing grade, soil conditions, and drainage patterns, along with buried infrastructure such as irrigation lines and older drainage systems. Many homes in Braeswood, TX have been renovated, expanded, or rebuilt over the decades, and those projects often left behind buried pipes, old fill soil, and changes in grade that are invisible from the surface. Finding them now prevents surprises later, when a trencher hits an unmarked line or new soil settles over an old excavation.
Sun and shade mapping matters just as much. Mature live oaks cast deep shade across many lots, and the amount of light each part of the yard receives decides which grass will thrive and which plants belong in each bed. This information shapes every later step, from sod selection to bed layout.
Tree Work Comes Before Anything Is Planted
If ornamental trees need pruning or a declining tree needs to come out, that work belongs at the very beginning of the project. Tree work involves ladders, equipment, falling branches, and foot traffic, all of which can crush new sod and flatten freshly planted beds. Completing it first protects everything installed afterward.
Timing matters for oaks in particular. Oak wilt, a serious disease in Texas, spreads through pruning wounds during its high-risk period from roughly February through June. Live oaks in the area are best pruned from late fall through January, so a spring landscaping project that involves oaks should schedule that work during the safe window beforehand. Professional tree pruning and trimming in this type of service covers trees up to ten feet in height, and larger trees that need high-canopy work are best referred to a licensed arborist.
Step Two: Shape the Ground
Once the site is understood, the ground itself comes next. Grade decides where every drop of rain goes, and it is far easier to correct while the yard is bare than after sod and plants are in place.
Re-Grading for Positive Surface Water Diversion Away From Foundation Slabs
Yard re-grading for positive surface water diversion away from foundation slabs reshapes the terrain so water naturally flows away from the house instead of pooling against it. Building codes commonly call for the ground to fall about six inches within the first ten feet from a foundation where space allows, a useful benchmark for how much slope a yard needs to move water away from the home.
The process starts with grade planning. Target elevations and slope corrections are set based on drainage goals and the landscaping that will follow. Using professional equipment, crews cut down high points, fill low spots, and contour the surface so water moves in the right direction. Redistributed soil is then compacted properly to prevent future settling, an essential step on clay, where loosely placed fill can sink unevenly over time. A final inspection confirms the direction of drainage flow before the project moves on. Getting this step right is what allows every later layer to perform as intended.
Step Three: Build the Drainage Underneath
With the grade established, drainage systems go in while the ground is still open. This is the stage that most often gets skipped, and the one that most often forces a yard to be landscaped twice.
Subsurface Perforated French Drain and Catch Basin Landscape Integration
Grading moves surface water, but some yards still collect water that needs an underground path off the property. Subsurface perforated French drain and catch basin landscape integration handles that job. A French drain trench is typically 12 to 18 inches deep and about 12 inches wide. The trench is lined with commercial-grade woven geotextile fabric that runs up the walls and wraps over the top, with seams overlapped at least 12 inches. That fabric is essential in clay soil because it keeps fine particles from clogging the gravel.
Clean, angular crushed stone, typically three-quarter-inch, goes into the bottom of the trench and around the pipe. The perforated pipe is laid with its perforations facing down and sloped at a minimum of one percent, so gravity carries water toward the outlet. That outlet might be a pop-up emitter, a daylight outlet, or a connection to an existing drainage system, always set lower than the collection point and placed to prevent backflow. Where surface water volume is high, a catch basin can collect runoff from a low area and feed it into the underground system.
Installing these systems now, before sod and beds, means the trench can be dug, filled, and restored once, without tearing up new plantings.
Engineered Dry Creek Beds for Localized Stormwater Management
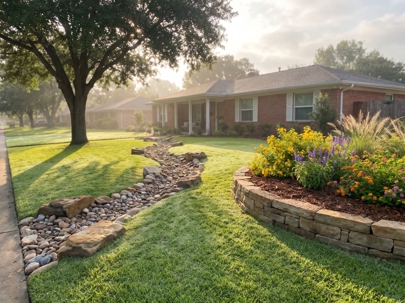
Some properties benefit from a drainage feature that works on the surface and adds visual interest at the same time. An engineered dry creek bed for localized stormwater management is a shaped channel lined with stone that carries runoff across the yard during storms and sits as an attractive landscape feature the rest of the time.
Construction begins by evaluating the grade, low spots, runoff entry points, and possible outlet locations. The channel is then excavated with natural curves and a consistent grade. Commercial-grade geotextile fabric is laid throughout before any stone goes in, followed by a coarser aggregate base and decorative river rock or creek stone. The stone is set deeper at the center and tapered toward the edges, with accent boulders at curves, the inlet, and the outlet. The outlet is finished with energy dissipation to prevent erosion where water leaves the channel. Because a dry creek defines the shape of the surrounding beds and lawn, it must be built before those areas are finished.
Irrigation Lines Before the Surface Closes
If the project includes a new or expanded irrigation system, the lines belong in the ground at this stage, after grading and drainage are complete but before soil preparation and planting. Running irrigation after sod is installed means cutting through new turf. Running it before grading means risking damage when the ground is reshaped. Placing it here, in the correct order, lets heads be positioned for the final layout of beds and lawn.
Building the Living Landscape on a Solid Base
With the ground shaped and the water managed, the project shifts from what lies below the surface to what will grow and show above it. The order still matters, because each living element depends on the structure built around it.
Step Four: Set the Borders and Low Walls
Borders and low walls define the shape of every bed and every lawn edge, so they go in before soil is amended and before anything is planted. Building them later risks damaging roots, disturbing new soil, and leaving ragged lines where the lawn meets the bed.
Natural stone landscape border masonry matching home architecture gives beds a permanent, finished outline. Natural stone works especially well for garden bed borders and decorative features, bringing a traditional or organic look, while concrete block offers a clean, modern profile with maximum structural strength. In both cases, walls and borders should align with the style of the home so the landscape and the architecture read as one design.
On heavy clay, low walls also solve a practical problem. A low retaining wall of 12 to 24 inches creates a defined, elevated planting zone where roots sit above the slow-draining native soil. For plants that dislike wet feet, that small lift can mean the difference between a bed that thrives and one that rots.
Step Five: Remediate the Clay
Once beds and lawn areas are defined, the soil itself can be prepared. Soil tilling and amendment for heavy Houston black gumbo clay remediation begins with removing existing vegetation, then tilling the soil to the appropriate depth and grading it to eliminate any remaining low spots.
Amendments are applied based on what the soil assessment found: correcting compaction, adjusting pH imbalances, or addressing nutrient shortages. Heroes Lawn Care of Bellaire uses proprietary soil amendment products developed in-house by an owner with two decades of research-and-development chemistry experience, which allows each blend to be matched to the specific challenges of Gulf Coast clay. Preparing the soil after borders are built and before planting means it is worked once, in exactly the areas that need it.
Step Six: Plant the Beds
With soil prepared, beds can finally be planted. Gulf Coast-suited ornamental planting featuring heat-tolerant shrubs and perennials gives beds lasting structure and color through long Houston summers. Salvia, lantana, Esperanza, and ornamental grasses all handle heat, humidity, and local soil conditions well, providing reliable color and texture with less replacement over time.
Plants are matched to the light conditions identified during the site evaluation, then installed at the correct spacing and depth for healthy root establishment. Seasonal color adds another layer. Cool-season annuals such as pansies and snapdragons go in during fall, while warm-season choices like vinca, begonia, and pentas follow in late spring, with annuals typically refreshed twice a year. Bed planting comes before the lawn so that crews and wheelbarrows are not crossing new sod while they work.
Step Seven: Lay the Sod Last
Sod is one of the most visible parts of any landscape, and one of the most easily damaged. That is why it goes in near the end, once all heavy work is complete and nothing else needs to cross the lawn.
Grass selection follows the sun and shade map from step one. St. Augustine handles shade better than any other warm-season grass used in the Houston area and is the standard choice for established, shaded properties. Within St. Augustine, Palmetto performs well in moderate shade, while Floratam is better suited to full sun. Zoysia offers a medium-maintenance alternative with excellent heat and drought tolerance and better shade tolerance than Bermuda, while Bermuda suits full-sun areas and uses less water under irrigation restrictions.
Zoysia and shade-adapted Palmetto St. Augustine sod installation and rolling follows a careful process. Sod is sourced and installed the same day for freshness, laid in staggered rows with tight seams, and then rolled to remove air pockets and press the roots into firm contact with the prepared soil. The first watering happens immediately. For the first two weeks, the sod and the top two inches of soil should stay consistently moist without becoming waterlogged, typically with daily watering. Starting in week three, watering is gradually reduced to encourage deeper rooting. Light foot traffic can usually resume after one week, with heavier use after two to three weeks.
Step Eight: Finish With Mulch
Mulch is the final layer, and it is applied last for a simple reason: it protects everything beneath it. Mulch installation for soil temperature regulation and moisture retention helps beds hold water between rains, buffers roots from Houston’s summer heat and occasional winter cold, and reduces weed pressure. Spread after planting is complete, it gives beds a clean, finished look and keeps soil from splashing onto plants and hardscape during storms.
Mulch also needs to be placed with care. It should sit around plants, not piled against stems or trunks, and it should never bury the base of a tree. Refreshed as it breaks down, it continues to protect the soil and support the beds for years.
Why One Team for Every Step Prevents Doing It Twice
The biggest risk in any landscape project is fragmentation. When different contractors handle tree work, grading, drainage, irrigation, borders, planting, and sod separately, nobody owns the sequence. One crew finishes its part without knowing what the next crew will need, and the homeowner ends up watching the same ground being disturbed again and again.
Heroes Lawn Care of Bellaire handles each of these stages under one plan. Tree pruning and trimming, leveling and regrading, French drains, catch basins, dry creeks, irrigation, retaining walls, flower beds, and sod installation are all part of its service range, so the entire sequence can be scheduled in the correct order from the first visit. Projects are guided by a Texas A&M-trained agronomist with 15 years of landscape design experience across the Houston area, ensuring that grade, drainage, soil, plants, and turf are planned as one connected system.
After installation, ongoing lawn care services keep the new landscape healthy, with fertilization, weed control, and disease control matched to the turf and soil that were just put in place. For homeowners in Braeswood, TX, that means one team accountable for the project from the first site walk to the last layer of mulch, and well beyond. Heroes Lawn Care of Bellaire is licensed by the Texas Department of Agriculture and the Texas Commission on Environmental Quality.
Conclusion: Do It Once, Do It in Order
The difference between a yard that holds up and one that gets redone is often not what was installed, but when. Lasting landscaping in Braeswood, TX follows a clear sequence. It begins with a site evaluation and any tree work, then re-grading to move water away from the foundation, then French drains, catch basins, and dry creek beds installed while the ground is open. Irrigation lines follow, then natural stone borders and low walls, soil remediation for black gumbo clay, bed planting, sod installation and rolling, and finally a protective layer of mulch.
Each step protects the one that follows, and together they create a landscape that drains well, grows steadily, and stays beautiful season after season. With the expertise to manage every stage in the right order, Heroes Lawn Care of Bellaire helps homeowners avoid the frustration of landscaping the same yard twice. A professional site evaluation is the first step toward doing it right the first time.